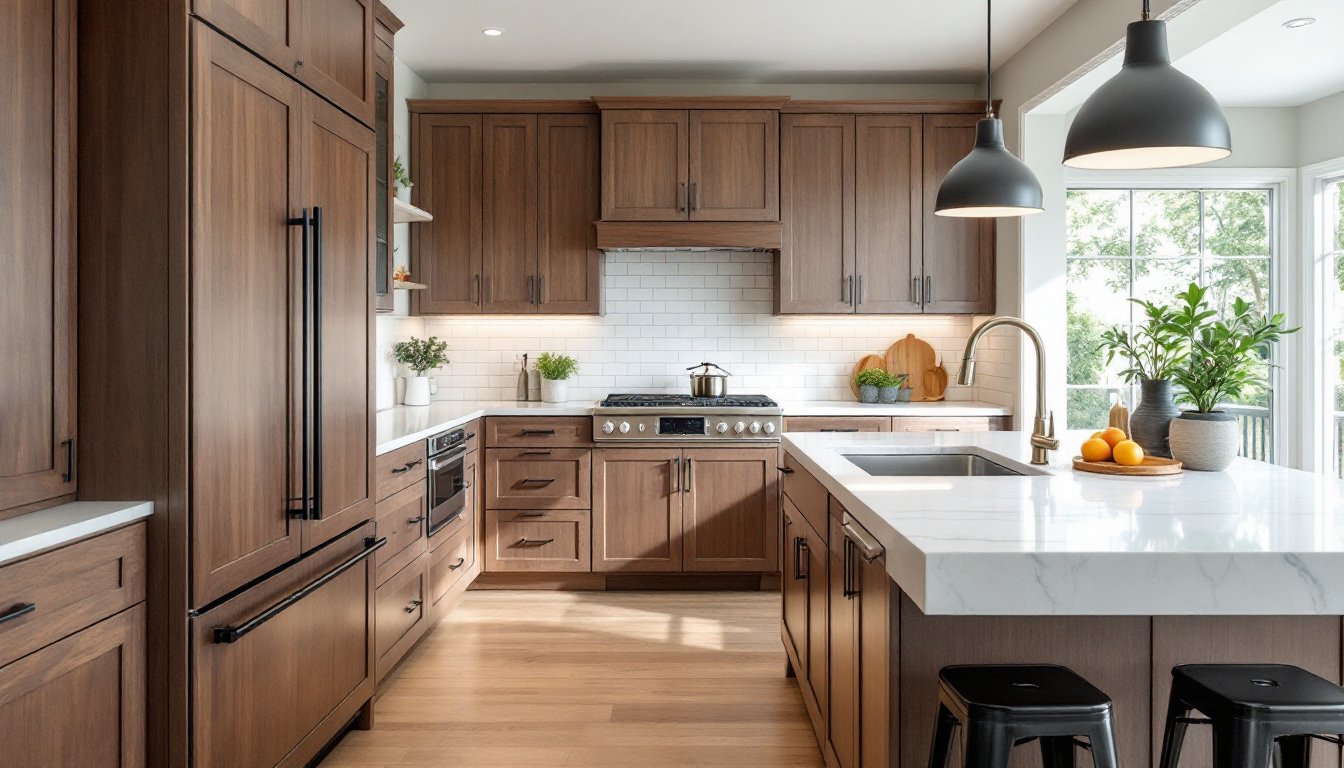
Shaker walnut kitchen cabinets combine the clean, unfussy lines of traditional Shaker design with the rich, warm tones of American black walnut. This pairing delivers a kitchen that feels both timeless and contemporary, a rare balance in cabinetry. Whether planning a full remodel or a cabinet replacement, understanding what makes this combination work (and what it costs) helps homeowners make informed decisions. Walnut isn’t the cheapest hardwood, and Shaker joinery demands precision, but the result is cabinetry that ages beautifully and adapts to shifting design trends.
Table of Contents
ToggleKey Takeaways
- Shaker walnut kitchen cabinets blend timeless Shaker design with rich, warm walnut tones that age gracefully and adapt to various design styles from minimalist to industrial.
- Walnut’s neutral brown base, dimensional stability, and ability to hide minor scuffs make it a practical, long-lasting choice for high-traffic kitchens compared to other hardwoods.
- Expect to budget $18,000–$35,000+ for a full shaker walnut kitchen, with costs ranging from $250–$500 per linear foot for semi-custom to $500–$1,200+ for custom construction.
- Pair shaker walnut cabinets with light countertops, white or textured backsplashes, and proper under-cabinet LED lighting (2700K–3000K) to prevent the space from feeling dark.
- Professional installation costing $2,500–$5,000 is recommended for walnut cabinetry due to its premium cost and the precision required, especially for inset doors and uneven kitchens.
- Maintain walnut cabinets with pH-neutral cleaners, avoid excess moisture, apply furniture wax every 6–12 months, and protect from direct UV exposure to preserve their golden-brown patina.
What Are Shaker Walnut Kitchen Cabinets?
Shaker cabinets trace back to 18th-century furniture made by the United Society of Believers, a religious sect that prized utility and simplicity. The hallmark is a five-piece door: four rails forming a flat frame, with a recessed center panel. No ornate carvings, no raised profiles, just clean geometry.
Walnut refers to American black walnut (Juglans nigra), a domestic hardwood known for its chocolate-brown heartwood, occasional purple undertones, and straight to wavy grain. It’s denser than oak (Janka hardness ~1,010 lbf) and machines well, making it ideal for the precise joinery Shaker doors require.
Shaker walnut cabinets can be full-overlay (doors cover the entire face frame), partial-overlay, or inset (doors sit flush with the frame). Inset construction is the most traditional, and the most expensive, because it demands tight tolerances. Most modern Shaker walnut cabinets use full-overlay for cost efficiency and a streamlined look.
Finishes range from clear polyurethane or water-based topcoats that preserve walnut’s natural color to oil-rubbed or waxed finishes that deepen the grain. Avoid heavy stains: walnut’s beauty lies in its natural variation.
Why Choose Walnut for Shaker-Style Cabinets?
Walnut brings warmth without the orange or yellow tones common in oak or maple. Its neutral brown base pairs well with whites, grays, and even bold accent colors, making it versatile across design styles, from Scandinavian minimalism to industrial loft aesthetics.
Unlike lighter hardwoods, walnut naturally hides minor scuffs and fingerprints. The grain’s depth means small dings blend in rather than stand out. This makes walnut a practical choice for high-traffic kitchens, especially those with kids or pets.
Walnut is dimensionally stable compared to species like cherry, which can shift significantly with humidity changes. That stability reduces the risk of warping or gaps in door panels over time, particularly in climates with seasonal swings.
The wood also ages gracefully. While walnut does lighten slightly with UV exposure, the shift is gradual and subtle, unlike cherry, which can turn almost orange, or maple, which yellows. Expect walnut to mellow into a golden-brown over a decade or two, depending on light exposure.
From a sustainability standpoint, American black walnut is responsibly harvested in the eastern U.S., with design sourcebooks often highlighting it as a domestically sourced option. Look for FSC-certified suppliers if chain-of-custody matters for your project.
Design Versatility: Styling Shaker Walnut Cabinets in Your Kitchen
Walnut’s mid-tone warmth acts as a neutral anchor. It works in all-walnut kitchens, but it also plays well with two-tone layouts: walnut base cabinets paired with white, cream, or light gray uppers. This contrast prevents the space from feeling too dark while adding visual interest.
Hardware choices matter. Brushed brass, aged bronze, or matte black pulls complement walnut’s organic tones. Avoid shiny chrome or polished nickel, they clash with the wood’s warmth. Simple bar pulls or cup pulls stay true to Shaker minimalism.
For flooring, light oak, white oak, or pale tile creates contrast and brightens the room. If using darker floors, keep walls and ceilings light to maintain balance. Walnut-on-walnut (cabinets and floors) can work but requires careful attention to lighting and finish variations.
Lighting is non-negotiable. Walnut absorbs light, so plan for under-cabinet LED strips (2700K–3000K color temperature) and ample overhead fixtures. Recessed cans, pendant lights over islands, and task lighting near prep zones prevent the kitchen from feeling cave-like.
Pairing with Countertops and Backsplashes
White or light-colored countertops, quartz in shades like Calacatta or Carrara, or honed marble, offer high contrast and prevent visual heaviness. If budget allows, quartzite (like Taj Mahal or Sea Pearl) adds natural variation without the maintenance headaches of true marble.
Darker countertops like soapstone, black granite, or charcoal quartz can work but risk creating a moody, closed-in feel. Balance with light backsplashes and open shelving.
For backsplashes, white subway tile is a safe, classic choice. Handmade ceramic tile in soft grays or greens adds texture without competing with the wood grain. Large-format porcelain slabs in concrete or limestone looks lean modern. Skip busy patterns, walnut’s grain provides enough visual interest.
Stainless steel appliances integrate seamlessly. Panel-ready appliances faced with matching walnut create a built-in, high-end appearance. If going with colored appliances, matte black or even muted sage can work, as seen in renovation tutorials featuring traditional-meets-contemporary kitchens.
Cost Considerations: Budgeting for Shaker Walnut Cabinets
Walnut is a premium hardwood. As of 2026, expect $18,000–$35,000+ for a full kitchen (10′ × 10′ baseline), depending on construction quality, door style complexity, and whether cabinets are custom, semi-custom, or stock.
Stock cabinets in walnut are rare. Most manufacturers (like KraftMaid or Thomasville) offer walnut as a veneer over plywood boxes in semi-custom lines. True solid walnut frame-and-panel doors with plywood box construction fall into the semi-custom or custom category.
Material costs break down roughly:
- Semi-custom walnut Shaker cabinets: $250–$500 per linear foot
- Custom walnut cabinets (inset doors, soft-close hinges, dovetail drawers): $500–$1,200+ per linear foot
Labor for professional installation typically adds $50–$100 per cabinet or $2,500–$5,000 for an average kitchen, depending on complexity (crown molding, islands, custom filler strips).
Budget alternatives include walnut veneer over MDF or particleboard cores (cheaper, but less durable) or using walnut selectively, say, a walnut island with painted perimeter cabinets. Some homeowners opt for walnut-stained maple or birch, though the grain won’t match walnut’s natural character.
Factor in hardware costs ($3–$15 per pull/knob × 30–50 pieces) and finishing supplies if refinishing down the line (walnut-friendly topcoats run $40–$80 per quart).
Prices vary by region and lumber availability. Walnut grown in the Midwest (Indiana, Ohio, Missouri) tends to cost less locally. Coastal markets may see higher prices due to shipping.
Maintenance and Care Tips for Walnut Cabinetry
Walnut is durable, but it’s still wood. Daily maintenance is straightforward: wipe down doors and drawer fronts with a damp microfiber cloth. Avoid soaking: excess moisture can swell joints or lift veneer over time.
Use a pH-neutral cleaner (like diluted dish soap) for grease or fingerprints. Skip ammonia-based glass cleaners, bleach, or abrasive powders, they can dull the finish or strip protective topcoats.
Every 6–12 months, apply a furniture polish or conditioning wax formulated for hardwood. Products with beeswax or carnauba wax feed the wood and restore luster. Avoid silicone-based sprays, which leave residue and make future refinishing difficult.
UV protection matters. Install window treatments or UV-filtering film if cabinets face direct sunlight. Walnut will lighten over time, but prolonged exposure accelerates color shift.
Inspect hinges and drawer slides annually. Tighten loose screws and lubricate soft-close mechanisms with a silicone-based spray (not WD-40, which attracts dust). Walnut’s density means hinge screws hold well, but overtightening can crack the wood.
If scratches occur, walnut-specific touch-up markers or furniture pens can blend minor damage. Deeper gouges may require sanding and spot-finishing, best left to a professional unless you’re comfortable with finish work.
Don’t hang wet towels or lean wet items against cabinet doors. Prolonged moisture contact can cause water rings or discoloration, especially on oil-finished walnut.
Installation Options: DIY vs. Professional
Installing kitchen cabinets is intermediate to advanced DIY territory. If you’ve hung upper cabinets before, understand how to find studs, and own a laser level, Shaker walnut cabinets aren’t fundamentally different from other styles. But walnut’s cost raises the stakes, mistakes are expensive.
Required tools include:
- 4-foot level and laser level (for plumb and level reference)
- Stud finder (cabinets must anchor into wall studs, typically 16″ on center)
- Drill/driver with assorted bits and a countersink bit
- Clamps (bar clamps and spring clamps for joining cabinets)
- Shims (for leveling base cabinets)
- Circular saw or miter saw (for scribing fillers or cutting nailers)
Steps (simplified):
- Mark a level reference line at 34.5″ above the floor for base cabinets (standard countertop height is 36″, minus 1.5″ for countertop thickness).
- Install upper cabinets first to avoid working over base units. Anchor into studs with 3″ cabinet screws through the hanging rail.
- Join cabinets together with 1.25″ screws through face frames or cabinet sides before securing to the wall.
- Shim base cabinets level and screw into studs at the back and sides.
- Install toe kicks, fillers, and trim last.
When to hire a pro:
- You’re installing an island with plumbing or electrical rough-ins (may require permits).
- The kitchen isn’t square (common in older homes), requiring extensive scribing and custom fillers.
- You’re doing inset doors, which demand precise installation, gaps must be uniform (typically 1/16″ reveal).
- You lack a helper. Upper cabinets (especially 36″ wide units) are heavy and awkward. Walnut is denser than pine: a large upper can weigh 80+ lbs.
Professional installation costs $2,500–$5,000 for an average kitchen, but it includes warranty coverage and ensures cabinets are plumb, level, and securely fastened. Given walnut’s investment, many homeowners view this as cheap insurance, as highlighted in working island kitchens with professional-grade finishes.
If DIYing, install a few cabinets first (like a small upper or single base unit) to gauge comfort level before committing to the full run.