Commercial carpet installation isn’t just scaled-up residential work, it’s a different animal entirely. The materials are tougher, the methods are faster, and the stakes are higher. Whether you’re outfitting a rental property, a small office, or a retail space, understanding how commercial-grade carpet goes down will save you time, money, and frustration. This guide walks through the key differences, material choices, tool requirements, and step-by-step process so you can decide whether to tackle it yourself or when to bring in a pro. Let’s get into what makes commercial installations tick.
Table of Contents
ToggleKey Takeaways
- Commercial carpet installation uses glue-down or carpet tile systems instead of residential tack strip methods, providing better stability and easier repairs in high-traffic environments.
- Proper subfloor preparation is critical for commercial carpet installation—grinding high spots, filling cracks, testing moisture, and achieving near-perfect flatness prevent premature wear and adhesive failure.
- Nylon and polypropylene fibers with low-pile, dense construction are ideal for commercial carpet, as they resist staining and crushing better than plush residential alternatives.
- A 100 lb. floor roller, heavy-duty carpet knife, notched trowel, and seaming iron are essential tools for professional-grade commercial carpet installation.
- Allow 24-48 hours for carpet acclimation before installation and maintain 24-72 hours cure time after laying to prevent shrinkage, gapping, and adhesive bonding failure.
- Common installation failures—skipping subfloor prep, using wrong adhesive, ignoring acclimation, and rushing the adhesive application—are easily preventable with careful planning and attention to detail.
What Is Commercial Carpet Installation and Why It Matters
Commercial carpet installation refers to the process of laying carpet designed for high-traffic, heavy-use environments like offices, retail stores, hotels, schools, and multi-family housing. Unlike residential carpet, which prioritizes comfort and aesthetics, commercial carpet emphasizes durability, stain resistance, and ease of maintenance.
The installation methods differ, too. Commercial projects often use glue-down or carpet tile systems instead of traditional stretch-in (tack strip) installations common in homes. These methods provide better stability under rolling chairs, foot traffic, and furniture moves. They also allow for easier repairs, swap out a damaged tile instead of replacing an entire room.
Why does this matter? Because using residential techniques on commercial-grade carpet, or vice versa, leads to premature wear, buckling, and warranty issues. Commercial spaces need flooring that can handle daily abuse without showing it. If you’re a property manager, small business owner, or DIYer upgrading a basement office or rental unit, knowing these distinctions up front keeps your project on solid ground.
Key Differences Between Commercial and Residential Carpet Installation
The gap between commercial and residential carpet work is wider than most people think. Here’s what sets them apart:
Material Construction: Commercial carpet uses low-pile, dense fiber construction (often nylon or polypropylene) with tighter weaves. Residential carpet tends toward plush, higher-pile fibers like polyester or wool blends. Commercial backing is stiffer and built for glue adhesion or modular tiles.
Installation Method: Residential installs typically rely on tack strips around the perimeter and padding underneath. Commercial jobs usually skip the padding entirely and use full-spread adhesive or pressure-sensitive adhesive to bond carpet directly to the subfloor. Carpet tiles use peel-and-stick backing or releasable adhesive for fast installation and replacement.
Subfloor Prep: Commercial projects demand near-perfect subfloor flatness. Any dips, cracks, or unevenness telegraphs through low-pile carpet and creates wear points. You’ll often need to grind high spots, fill low areas with floor leveling compound, and ensure the slab is clean, dry, and free of contaminants. Residential installs are more forgiving thanks to thicker padding.
Seaming Techniques: Commercial seams use heat-activated seaming tape and a seaming iron, just like residential work, but tolerances are tighter. Poor seams show immediately in commercial settings and become trip hazards. Many commercial installers prefer carpet tiles specifically to avoid visible seams altogether.
Permits and Codes: Depending on jurisdiction and building type, commercial carpet installation may require permits, especially in occupied commercial buildings or multi-family housing. Fire-rating standards (like ASTM E648 critical radiant flux) also apply to commercial spaces, check local codes before ordering materials.
Choosing the Right Commercial Carpet for Your Project
Not all commercial carpet is created equal. Picking the wrong type for your space leads to early replacement and wasted money.
Carpet Tiles vs. Broadloom: Carpet tiles (typically 18″x18″ or 24″x24″ squares) are the go-to for most commercial jobs. They install fast, allow for creative patterns, and make repairs simple, pop out a stained tile and drop in a new one. Broadloom (roll carpet, usually 12′ wide) works better for large, open areas where seams can be minimized, but it’s less forgiving if damage occurs.
Fiber Type: Nylon is the workhorse of commercial carpet, tough, resilient, and stain-resistant when treated. Polypropylene (olefin) costs less and resists moisture, making it ideal for basements or areas prone to spills, but it doesn’t bounce back as well under furniture. Avoid polyester and wool in true commercial settings: they wear too quickly.
Pile Height and Density: Look for loop pile (like level loop or patterned loop) or cut-and-loop styles. These handle traffic better than cut pile. Dense, low-profile carpets (under 1/4″ pile height) hide dirt, resist crushing, and roll smoothly under desk chairs.
Backing and Adhesive Compatibility: Most commercial carpet comes with action-back or cushion-back backing. Action-back requires separate adhesive: cushion-back includes an attached thin foam layer. Carpet tiles often use peel-and-stick or releasable adhesive systems, releasable lets you reposition tiles during install and remove them later without damaging the subfloor.
Fire and Safety Ratings: If your project is in a commercial building, verify the carpet meets local fire codes. Look for a Class I or Class II flame spread rating (per ASTM E84) and appropriate smoke development ratings. Reputable suppliers list these specs on product data sheets.
Essential Tools and Materials for Commercial Carpet Installation
Commercial carpet work requires a specific toolkit. Borrowing tools from a residential job won’t cut it.
Tools You’ll Need:
- Carpet knife with heavy-duty hooked blades (change blades often, dull blades cause ragged cuts)
- Straightedge (6′ or 8′ aluminum or steel) for guiding cuts
- Seaming iron (if using broadloom) and seam roller
- Notched trowel (1/16″ x 1/16″ x 1/16″ square notch is common for full-spread adhesive)
- 100 lb. floor roller (rent this, it’s essential for bonding glue-down carpet)
- Utility knife and extra blades
- Chalk line for layout lines
- Tape measure and framing square
- Knee kicker (only if doing perimeter tack strip work, rare in commercial)
- Subfloor scraper and floor grinder (for prep)
- Respirator mask (adhesive fumes are no joke)
- Knee pads, safety glasses, and work gloves
Materials Checklist:
- Commercial carpet (tiles or broadloom)
- Carpet adhesive (pressure-sensitive or full-spread, matched to carpet backing)
- Seaming tape and seam sealer (for broadloom)
- Floor leveling compound and primer (if subfloor needs prep)
- Moisture barrier or vapor retarder (for concrete slabs, especially below-grade)
- Transition strips (metal or vinyl) for doorways and edges
Don’t skimp on adhesive. Using the wrong type voids warranties and leads to delamination. Many professional installers stock contractor-grade adhesives that small shops don’t carry, worth asking if you’re sourcing locally.
Step-by-Step Commercial Carpet Installation Process
Here’s the basic workflow for a glue-down broadloom installation. Carpet tile installs follow a similar prep process but skip the adhesive troweling in favor of peel-and-stick or releasable adhesive.
1. Prepare the Subfloor
Remove all existing flooring, baseboards, and debris. Concrete slabs must be clean, dry, and smooth. Grind down high spots and fill cracks or low areas with floor leveling compound. Allow leveling compound to cure per manufacturer instructions (usually 24-48 hours). Test concrete moisture levels with a calcium chloride test or relative humidity probe, excess moisture causes adhesive failure. Apply a moisture barrier if needed.
2. Acclimate the Carpet
Unroll carpet in the space (or unbox tiles) and let it acclimate for 24-48 hours at room temperature (65-75°F). This prevents expansion or contraction after install.
3. Plan Your Layout
Snap chalk lines to establish your starting point. For broadloom, start along the longest wall or center of the room, depending on seam placement. For carpet tiles, find the center of the room and work outward in a grid to balance cut tiles at edges.
4. Spread Adhesive
Using a notched trowel, spread adhesive evenly over a manageable section (typically 50-100 sq ft at a time). Follow the adhesive’s open time (usually 15-30 minutes) and working time (up to 60 minutes). Don’t over-apply, excess adhesive telegraphs through the carpet.
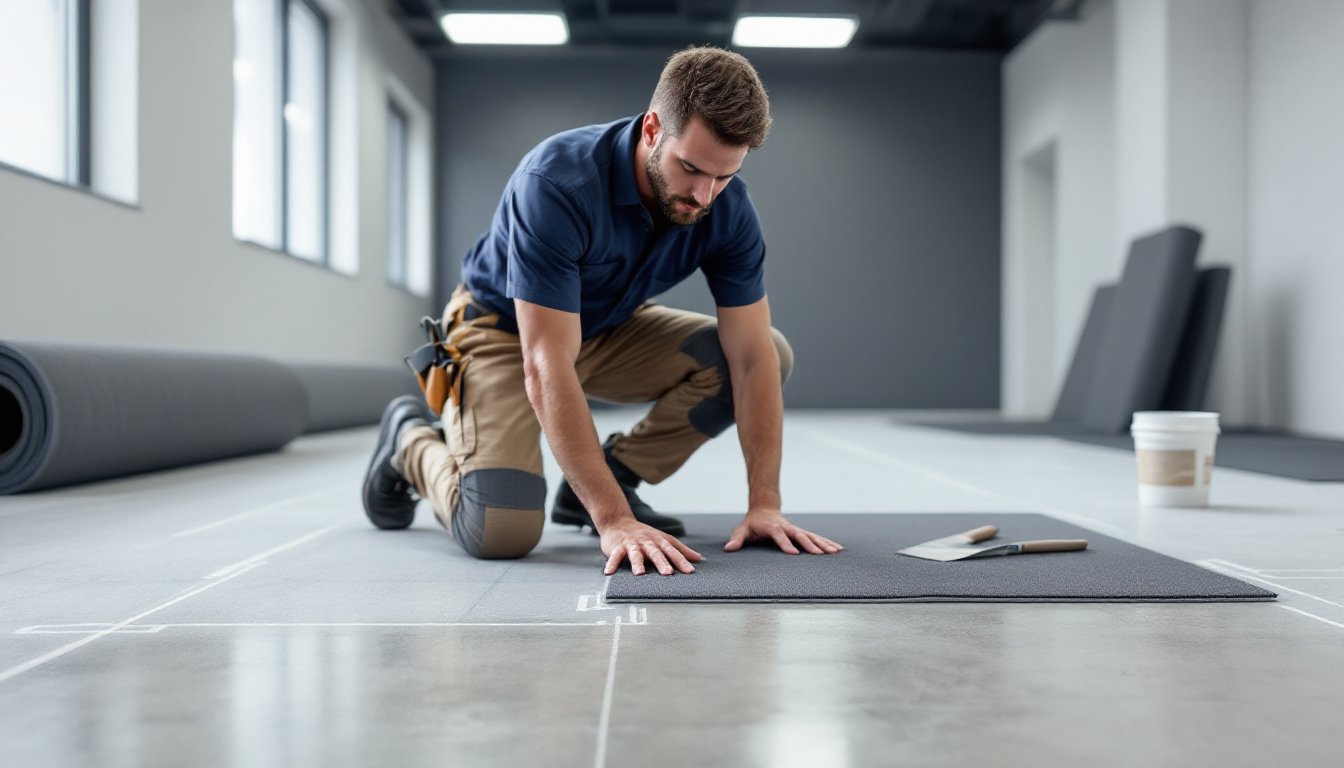
5. Lay the Carpet
Roll out broadloom carefully into the wet adhesive, keeping it straight along your chalk line. Avoid trapping air bubbles. For tiles, press each one firmly into place, butting edges tightly together without overlapping. Use a hand roller or floor roller to ensure full contact between carpet and adhesive. Roll in multiple directions.
6. Seam the Carpet (Broadloom Only)
Overlap seams by about 1″, then use a straightedge and carpet knife to cut through both layers simultaneously (called a double-cut). Remove scrap pieces, slide heat-activated seaming tape under the seam, and run a seaming iron along the tape to activate the adhesive. Press edges together with a seam roller while the adhesive is hot.
7. Trim and Finish Edges
Trim excess carpet at walls and doorways using a wall trimmer or straightedge and knife. Install transition strips at doorways and along edges where carpet meets other flooring types. Use a stair tool to tuck edges if working with tack strips (rare in commercial installs).
8. Roll and Inspect
Once the entire floor is down, roll the surface again with the 100 lb. floor roller to ensure maximum adhesive bond. Inspect seams, edges, and tile alignment. Address any loose areas or gaps immediately.
9. Allow Cure Time
Keep foot traffic off the floor for 24 hours minimum. Full adhesive cure takes 48-72 hours. Avoid moving furniture or rolling heavy loads until fully cured.
Cost planning is tricky, materials, adhesive, and tool rentals vary widely by region. Online resources like HomeAdvisor and ImproveNet offer project cost calculators, but always add a 10-15% buffer for waste and contingencies.
Common Mistakes to Avoid During Installation
Commercial carpet installation is unforgiving. Small errors become big problems fast.
Skipping Subfloor Prep: The most common DIY failure. Any moisture, dirt, or unevenness in the subfloor telegraphs through the carpet and causes adhesive failure. Spend the time grinding, leveling, and cleaning, it’s 80% of a successful install.
Using the Wrong Adhesive: Pressure-sensitive adhesive isn’t the same as full-spread. Carpet tiles with attached cushion backing need different adhesive than action-back broadloom. Read the carpet manufacturer’s installation guide and match adhesive type exactly, or you’ll void the warranty.
Ignoring Acclimation: Installing cold carpet or tiles straight from the truck causes shrinkage and gapping once they warm up. Let materials sit at room temperature for at least 24 hours.
Poor Seam Placement: Don’t run seams in high-traffic pathways or perpendicular to a doorway. Plan seams parallel to dominant traffic flow and away from natural light sources that highlight imperfections.
Rushing the Adhesive: Troweling adhesive over too large an area at once causes it to skin over before you can lay carpet. Work in sections and watch the clock.
Forgetting the Roller: Hand pressure isn’t enough. A 100 lb. roller is mandatory for glue-down installs, without it, the carpet won’t bond properly and will lift over time.
Cutting Corners on Moisture Testing: Concrete that looks dry can still have high moisture content. Adhesive breaks down, mold grows, and carpet delaminates. Test every concrete subfloor, especially below-grade or new pours.
Underestimating Difficulty: Commercial carpet installation is physically demanding and detail-oriented. If the job involves more than a few hundred square feet, structural subfloor issues, or a tight deadline, hiring a pro is often smarter than DIY.
Conclusion
Commercial carpet installation demands precision, the right materials, and honest prep work. Whether you’re laying tiles in a small office or broadloom in a retail space, understanding the differences from residential work, and respecting the process, makes the difference between a floor that lasts a decade and one that fails in a year. If your project involves tricky subfloors, large square footage, or strict timelines, don’t hesitate to bring in experienced help. But for smaller commercial spaces or DIYers ready to invest the effort, this is a learnable skill that delivers professional results.